Using Pusher Channels with Symfony
AuthorMatteo Kovačić
DateOct 28, 2020
In modern web applications, updating parts of the pages in real time is a common requirement. There are many options, from more low-level open-source projects like socket.io to fully managed services like PubNub, Ably, or Pusher Channels.
After trying a few options, here at Bornfight we chose Pusher Channels for all our ongoing projects. Some of the key reasons are:
- Pusher is present for a long time and Channels are their most stable and oldest product
- Private channels with auth per channel which allows authorization on the fly
- Developer-friendly client and server libraries in almost every modern language
- Free sandbox and fair pricing for paid plans

Creating a new Pusher app
To follow this tutorial, you will need a free sandbox account which you can create here. After you have your account ready, from the channels dashboard you can create a new app.
Installation
If you still don’t have Symfony project ready, you can initialize one:
composer create-project symfony/website-skeleton my_project_namePusher provides the official PHP library for interaction with its API. The library can be installed from the root project directory of your newly created project:
composer require pusher/pusher-php-serverThe library also has a Symfony recipe which will create a new service and add environment variables to .env file.
Configuration
The recipe gave us a good starting point, but it’s a good practice to have service definitions only in services.yaml. Following this, we can remove a file config/packages/pusher_php_server.yaml generated by the recipe and add a new service to services.yaml.
services:
    ...

    Pusher\Pusher:
        arguments:
            $auth_key: '%env(PUSHER_KEY)%'
            $secret: '%env(PUSHER_SECRET)%'
            $app_id: '%env(PUSHER_APP_ID)%'
            $options:
                cluster: '%env(PUSHER_CLUSTER)%'
                useTLS: true
In your .env file, the recipe already added a new pusher section with 3 environment variables.
###> pusher/pusher-php-server ###
PUSHER_APP_ID=
PUSHER_KEY=
PUSHER_SECRET=
###< pusher/pusher-php-server ###
Because we also use PUSHER_CLUSTER, add it at the end of the section and add values with your app credentials provided in the app dashboard under App Keys section.
After adding values, your .env file should look something like:
###> pusher/pusher-php-server ###
PUSHER_APP_ID=12345
PUSHER_KEY=your-key
PUSHER_SECRET=your-secret
PUSHER_CLUSTER=eu
###< pusher/pusher-php-server ###
Now you have configured your service and you can use is it with dependency injection.
Demo
To verify that everything works, you can create a simple demo page.
Use a maker to create a new controller:
php bin/console make:controller DemoControllerIn the newly generated controller, add the following two methods:
/**
 * @Route("/demo", name="demo", methods={"GET"})
 */
public function index(): Response
{
    return $this->render('demo/index.html.twig');
}

/**
 * @Route("/demo/say-hello", name="demo_say_hello", methods={"POST"})
 */
public function sayHello(Pusher $pusher): Response
{
    $pusher->trigger('greetings', 'new-greeting', []);

    return new Response();
}
Now we only need to modify our template which should already be created by maker. In templates/demo/index.html.twig add the following content and replace your-key with the key you already added as PUSHER_KEY environment variable.
{% extends 'base.html.twig' %}
{% block title %}Pusher Demo!{% endblock %}
{% block body %}
<button type="button" id="say-hello-button">Say Hello!</button>
{% endblock %}
{% block javascripts %}
<script src="https://code.jquery.com/jquery-3.5.1.min.js"></script>
<script src="https://js.pusher.com/7.0/pusher.min.js"></script>
<script>
var pusher = new Pusher('your-key', {
cluster: 'eu'
});
var channel = pusher.subscribe('greetings');
channel.bind('new-greeting', function() {
alert('Hello!');
});
$('#say-hello-button').click(function () {
$.post("{{ path('demo_say_hello') }}");
});
</script>
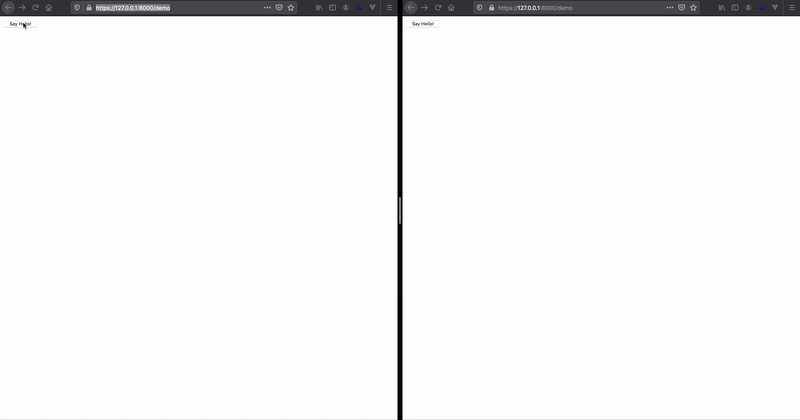
{% endblock %}Your demo should be ready to go. Start Symfony built-in server with symfony server:start and navigate to /demo page with at least two browser windows or tabs. After clicking on the button, you should get an alert on all opened tabs.
Conclusion
You have a lot of options when choosing technology for real-time updates and Pusher is one of them. You get a lot of low-level WebSocket issues handled out of the box, without compromising a great number of features and flexibility.
If you already use Pusher, what do you think about it? Or if not, which technology do you use to send real-time updates to your clients?